LVGL grid and widgets
The grid
The display is a 300 x 400 ePaper panel in portrait orientation. It uses the LVGL library provided by ESPHome to create a 4x6 grid system. Each widget takes up space on this grid, and they cannot overlap.
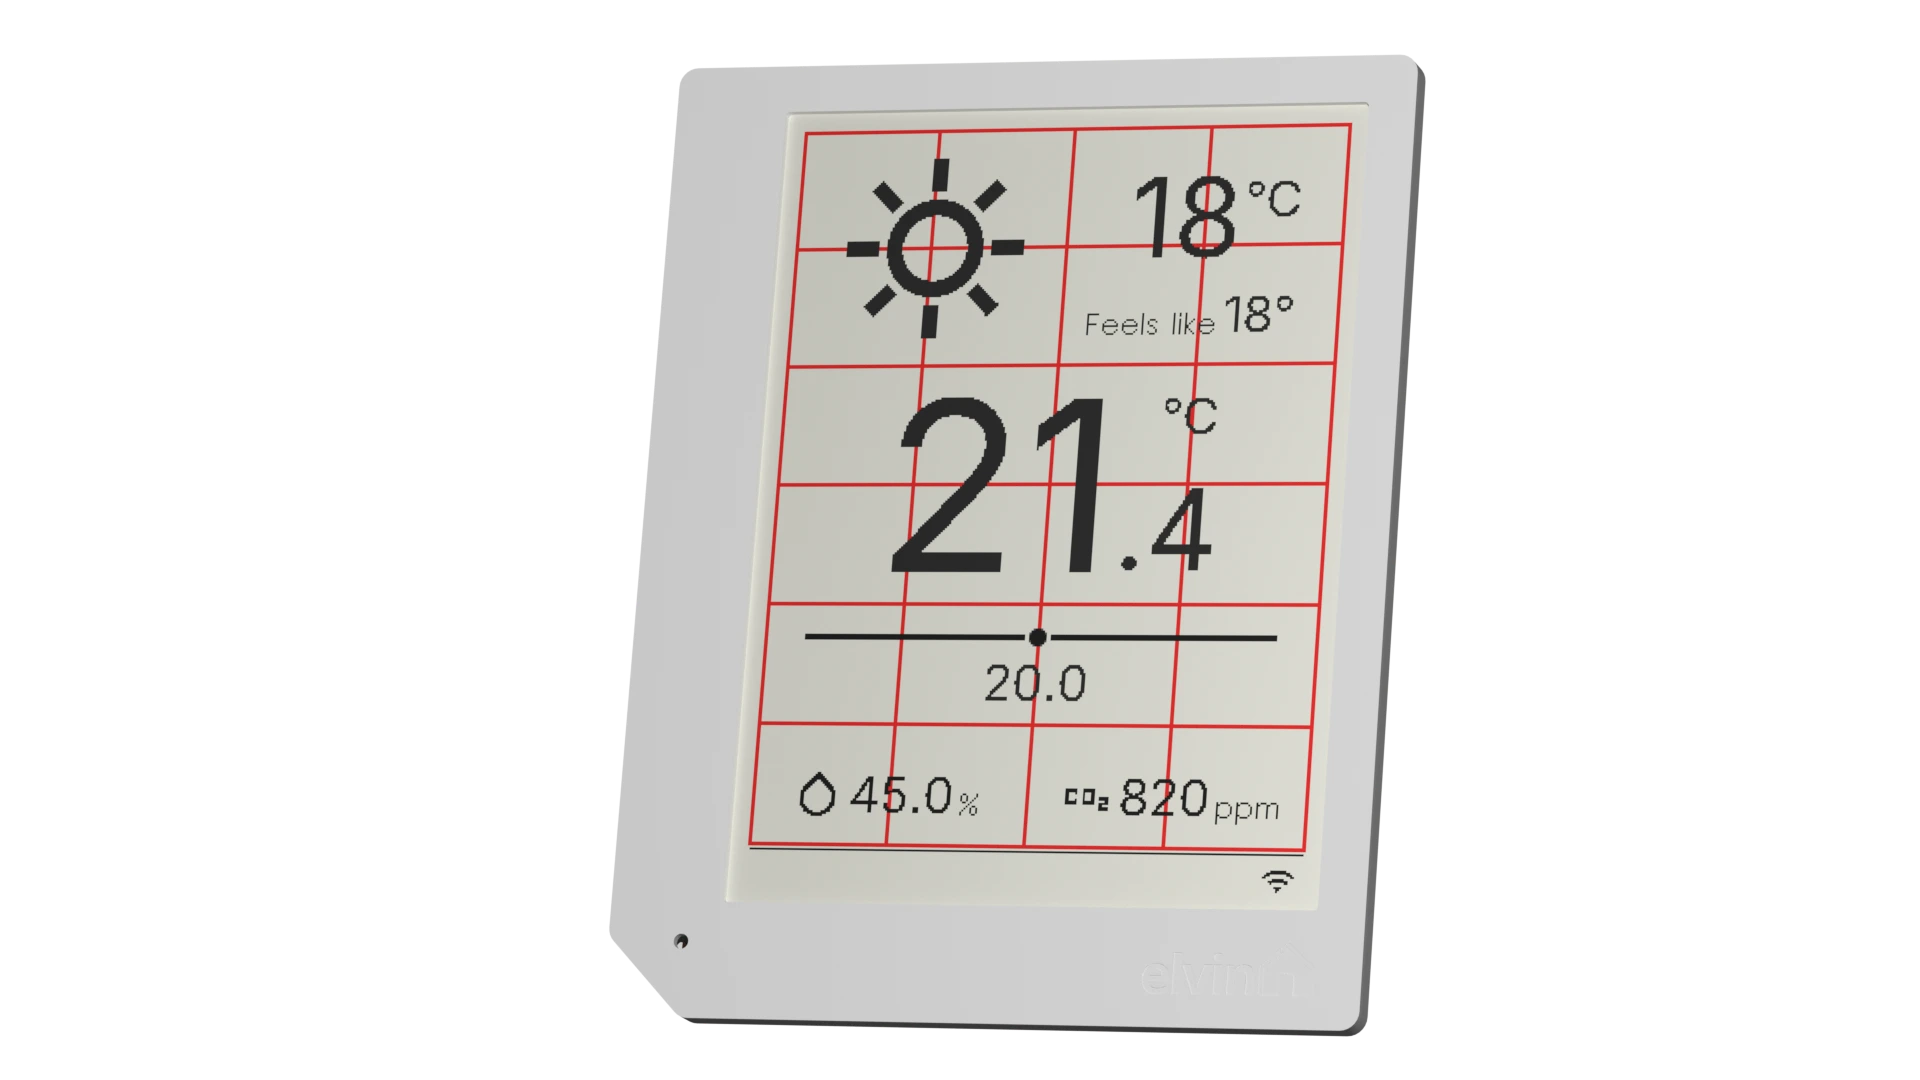
It can also be extended with multiple pages, which can be accessed by swiping left and right across the screen. A range of pre-defined widgets are at your disposal, and with some LVGL know-how it's possible to create your own widgets to place on the grid.
What a widget is
Each widget is a self-contained YAML file in esphome/widgets/ that combines three layers:
- Substitutions - parameters that make the widget reusable: grid position, page assignment, instance identity and Home Assistant entity references. This is the configuration for the widget that you provide.
- Sensors - an entity that provides data to power the widget and display some information. This can be data from the device itself, like temperature, humidity, CO2 or light level, or a
homeassistantplatform sensor that can read data from other entities defined in Home Assistant. - LVGL objects - containers, labels, buttons and sliders arranged on the grid. This defines what will actually be shown on the display. Widgets use
!extendto attach themselves to the page and grid containers defined in the core files.
By default, the display is set to refresh every 5 minutes, and updating immediately when touched. This means widgets can update their data as soon as it arrives, and the display will be updated in the next refresh.
Placing a widget
You add a widget to your config by importing its file in the packages: block and passing its substitutions as vars:. grid_x sets the column and grid_y the row. The numbers start at 0, so grid_x can have numbers 0-3, and grid_y can be 0-5. This defines the location of the top left corner of the widget, so make to check the size of the widget and ensure it doesn't go over the edge of the grid. Overlapping or off-grid widgets will create an error when running ESPHome.
The example below imports the core grid together with three widgets:
packages:
  main:
    refresh: 4h
    url: https://codeberg.org/elvinhome/ctrl-one
    ref: v${version}
    files:
      - [...] # other core files
      - path: esphome/widgets/widget-temperature.yaml
        vars:
          grid_x: 0
          grid_y: 1
      - path: esphome/widgets/widget-humidity.yaml
        vars:
          grid_x: 0
          grid_y: 4
      - path: esphome/widgets/widget-co2.yaml
        vars:
          grid_x: 2
          grid_y: 4
The temperature widget spans all 4 columns and 2 rows, which is why it only needs a start position. For widgets that can be sized freely - buttons, sliders and switches - the substitutions include size_x and size_y, so you control both the position and the span. To understand what can be configured in a widget, just check the top of that widget's file - it includes a list of the available substitutions that can be used.
The first page, page_0 is added by default, and when not specified widgets will be placed here. To add extra pages, add in the esphome/core/lvgl-extra-page.yaml, which creates a numbered page using a page_number substitution. Swiping left and right moves between pages.
packages:
  main:
    refresh: 4h
    url: https://codeberg.org/elvinhome/ctrl-one
    ref: v${version}
    files:
      [...] # other core files
      - path: esphome/core/lvgl-extra-page.yaml
        vars:
          page_number: 1
      - path: esphome/widgets/widget-temperature.yaml
        vars:
          page_number: 1
          grid_x: 0
          grid_y: 1
ESPHome's substitutions system has a gotcha - when a substitution is specified in one package (widget), that value will be carried on through to subsequent packages unless it is changed.
If page_number: 1 is set on the first widget in the list, and no page_number is set on the second widget, the second widget will also be placed on page 1. To avoid this, make sure to explicitly set the page_number on every widget so you're sure they end up in the right place. This applies to every type of substitution, not just page numbers.
Available widgets
This list is updated periodically. To see the full list of available widgets and also understand the substitutions that can be set to configure them, check the files directly at https://codeberg.org/elvinhome/ctrl-one/src/branch/main/esphome/widgets
Widget | Purpose |
|---|---|
widget-temperature | Large temperature readout from the SCD40 sensor. |
widget-humidity | Humidity readout from the SCD40 sensor. |
widget-co2 | CO2 readout from the SCD40 sensor. |
widget-setpoint | Thermostat target temperature (with the thermostat add-on). |
widget-weather | Current weather from a Home Assistant weather entity. |
widget-forecast | Five-day forecast strip from a weather entity. |
widget-plant | Plant status (moisture, conductivity, illuminance) from a Home Assistant plant entity. |
widget-button | Toggle button for a Home Assistant entity (lights, fans, and so on). |
widget-slider | Brightness slider for a Home Assistant light. |
widget-switch | On/off switch for a Home Assistant entity. |
widget-ventilation | Fan speed control for a ventilation entity. |
widget-illuminance | Ambient light level readout. |
widget-wifi | WiFi signal indicator. |
The esphome/layouts/ directory contains ready-made reference templates - thermostat, weather and plant monitor - that show how to arrange these widgets. Copy their entries into your own packages: block and adjust the entity names to match your Home Assistant setup.
Controlling Home Assistant devices. Widgets such as buttons, sliders, switches and ventilation trigger actions in Home Assistant. For these to work, the device must be allowed to perform Home Assistant actions. In Home Assistant, open Settings > Devices & Services, open the ESPHome integration, select your CTRL ONE, and enable Allow the device to perform Home Assistant actions.
Making your own widgets
As a starting point, we recommend using the Button Widget as a base. It contains a basic structure for bringing in a sensor from home assistant, creating an LVGL element within the grid on a page, and a font file for bringing in custom icons.
The file for the widget can be kept alongside your main ESPHome ctrl-one.yaml file and imported directly like so:
packages:
  main:
    refresh: 4h
    url: https://codeberg.org/elvinhome/ctrl-one
    ref: v${version}
    files:
      - [...] # All the files included from the main CTRL ONE repository
  my_custom_widget: !include
    file: my-custom-widget.yaml
    vars:
      page_number: 1
Keeping flash usage down
The CTRL ONE uses a microcontroller with limited flash space. Adding in large numbers of unnecessary fonts or icons will cause ESPHome to fail to compile.
- Use included fonts where possible: fonts epd_16, inter_25 and inter_number_56 are designed to be used across all widgets. It includes a full alphanumeric set of characters in sizes 16 and 25, and larger numbers in size 56 for displaying data.
- Only include the characters you need from a custom font: If you require a larger or different font for a number display, make sure to only include those characters.
- Limit the number of different icons: custom icons are the largest contributor to flash size, especially if they are larger.
- Avoid images: you may be tempted to create a custom image with your custom text/fonts etc, but this will likely use up far more flash than if you bring the fonts in directly. The images are uncompressed, so any whitespace in the image also takes up space.
Additionally, a number of ESPHome components are included by default to meet the "Made for ESPHome" certification criteria. These components are included to make it easier for a first-time user to get the CTRL ONE connected to their network, but are not necessary once you're making your own firmware. Extra space can be easily freed up by removing the esp32_improv and improv_serial components.