
I want to bring the control of my apartment's ventilation system into Home Assistant, so I can automate it using the CO2 and humidity sensors in my CTRL ONE ePaper smart room controllers. But how do you do that without touching the ventilation system itself? You hack a remote control with an ESP32 in the back. Now I can control the ventilation from anywhere in the house, and it knows to turn up when automatically it starts getting stuffy inside.
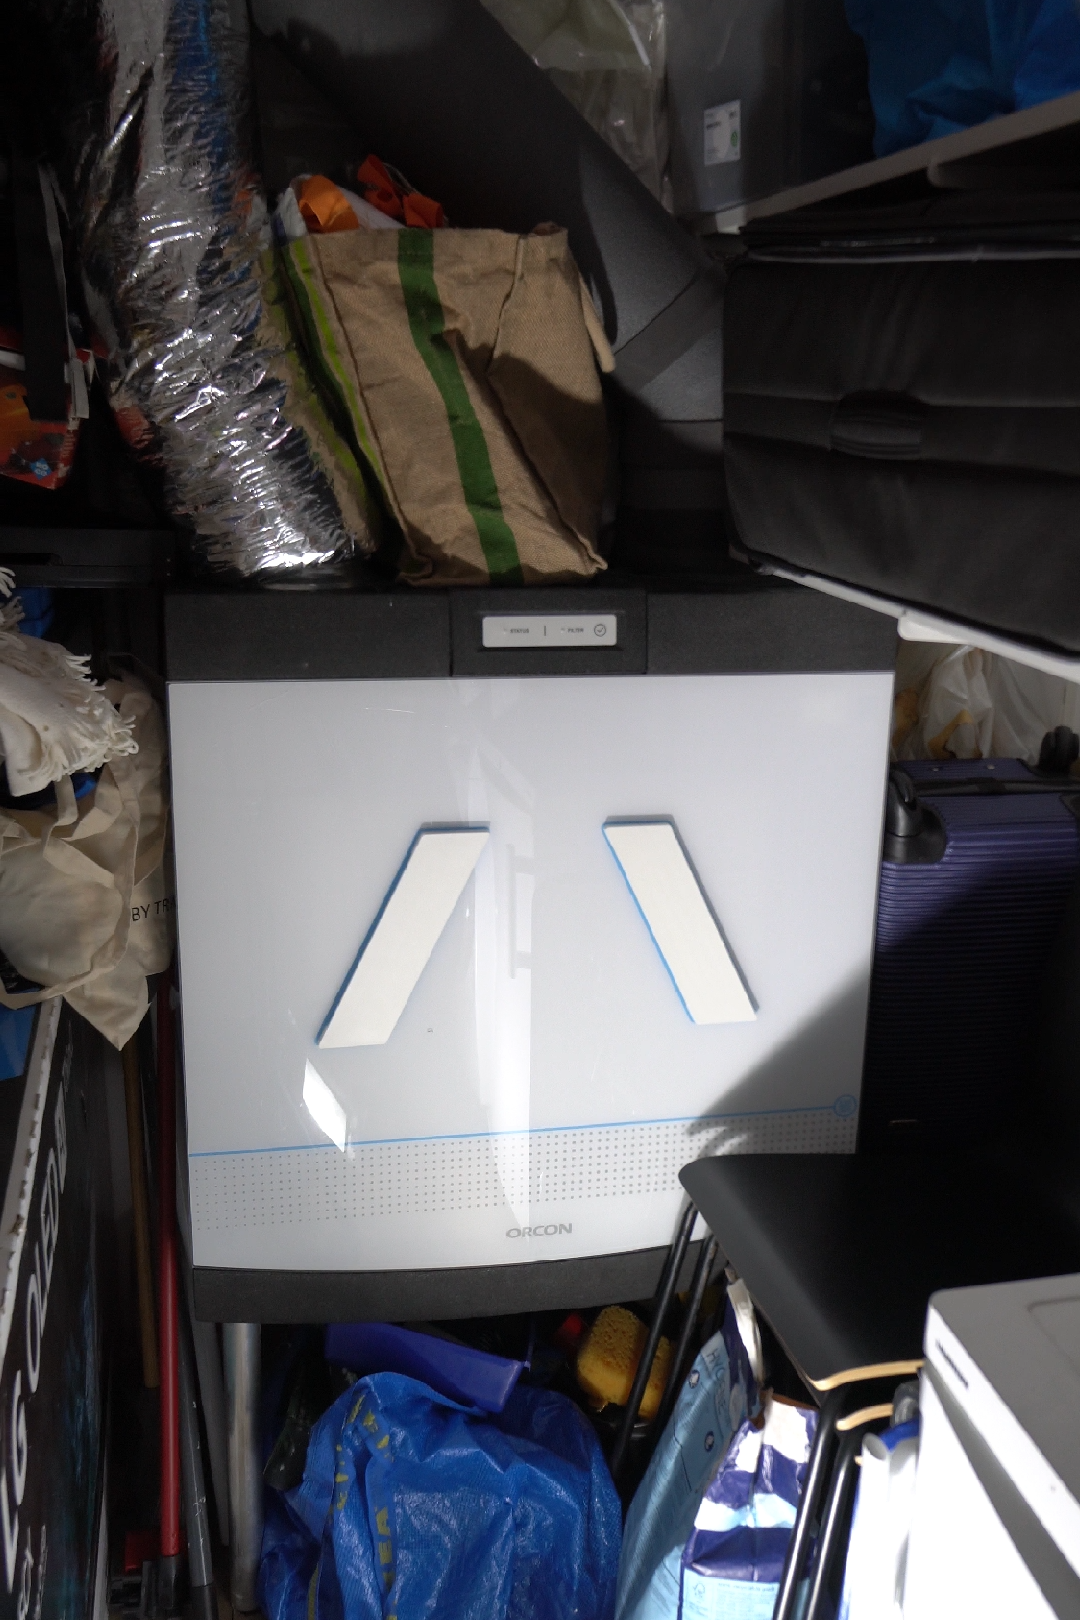
This big ol' ventilation unit takes up a very large amount of space in the utility room of my apartment. I live in a modern build, and in the Netherlands at least, they're always built the same - nice, big windows, where basically none of them can open. As such, these units are essential to pull the fresh air in, and keep the damp out. There's no such thing as an "off" setting, and it failing is a serious issue.
And as I rent the place, the last thing I want to do, just for this once, is to pull the thing open and make it smarter. You now know where I draw the line. But that doesn't mean all is lost - it came with a remote to control the speed of the fan. If I break that, it's a much cheaper fix.
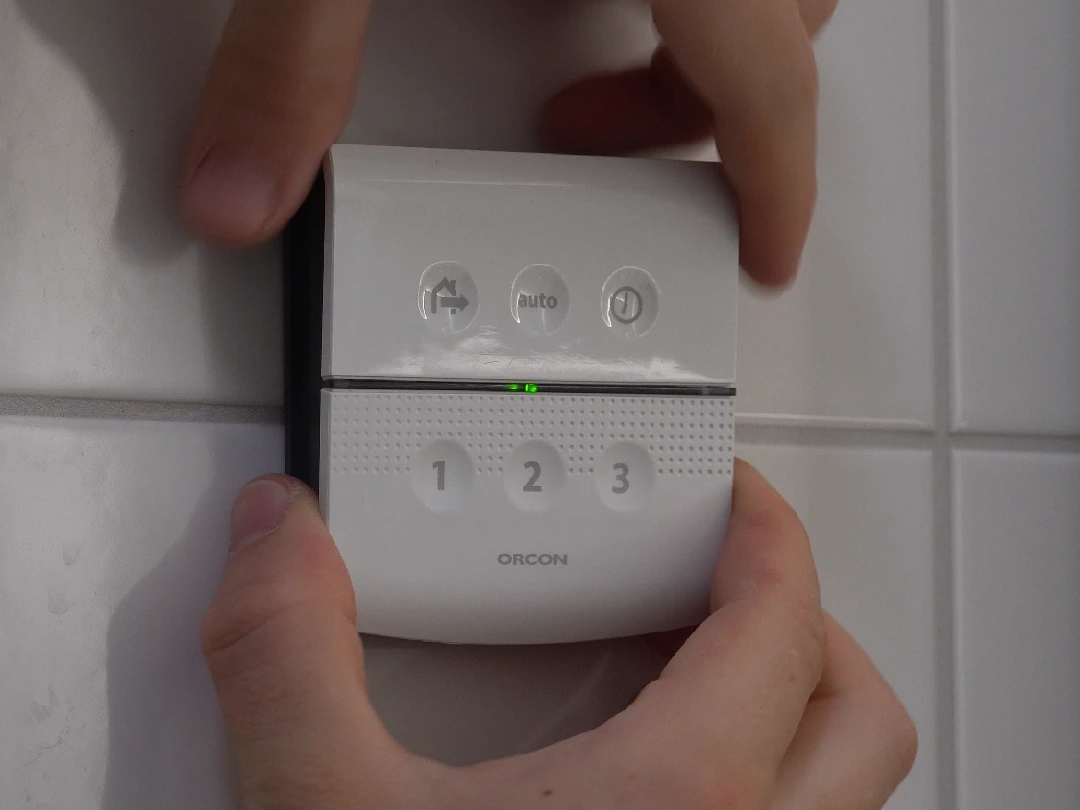
What this means is that I've got two avenues to work with. The remote is speaking to the ventilation unit wirelessly, so the first way is that I could make something that also speaks the same language.
Doing some quick research on this Orcon 15RF remote shows that it uses a proprietary protocol developed by Honeywell named RAMSES-II, at least according to this GitHub repository. Someone's already done some of the work for me, reverse engineering the protocol. That's great, but it also works over the 868MHz channel, which means that an ESP32 can't communicate over that out of the box, as it only runs on the standard 2.4GHz used by WiFi, Zigbee, Thread and others.
So while I could probably figure it out, I'd have to go and buy a radio that can use that channel, and then I would need to port the reverse engineered code to work on ESPHome. And then probably spend hours banging my head against a wall debugging it essentially in the dark, trying different commands to see if the ventilation unit reacts.
Thing is, I already have a radio! And that radio already knows the entire communication protocol of the ventilation unit. It's the remote itself. Let's open it up and take a look:
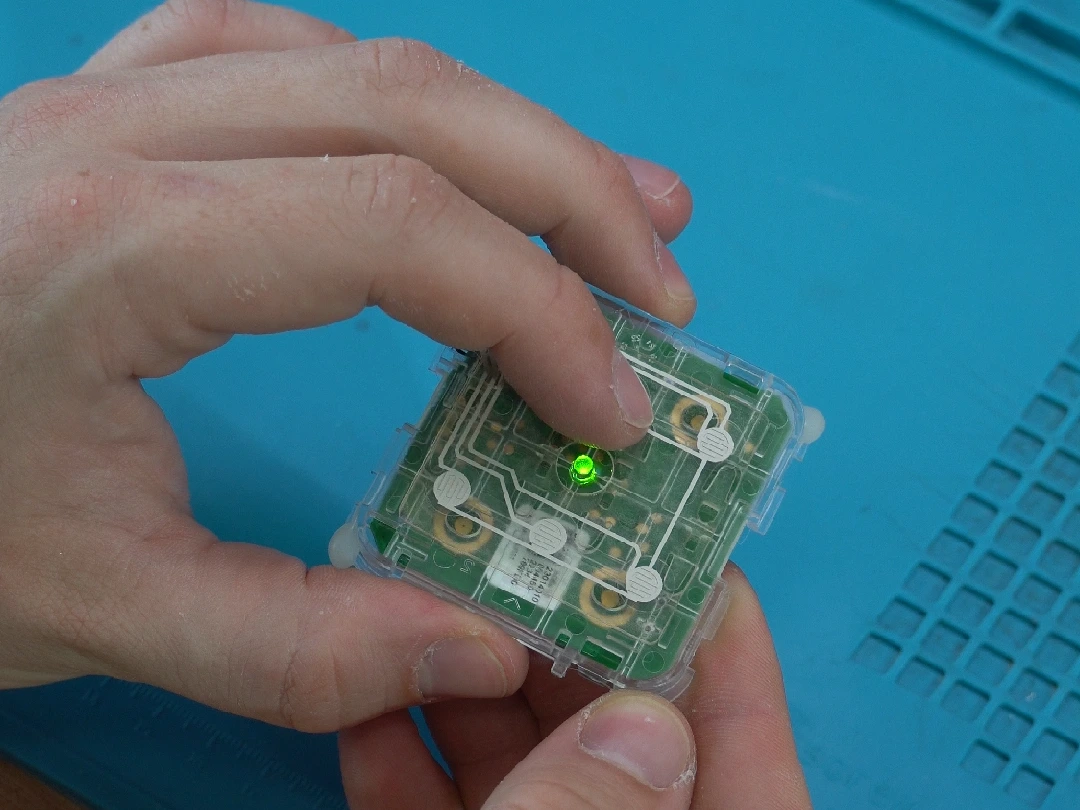
It's super simple. These resistive pads activate when you press on the outer housing, and activate one of the functions of the remote. It's got a 1, 2 and 3 button for the fan speeds, along with an auto button and a few timer functions. The auto function is honestly pretty useless - the ventilation unit has a humidity sensor on the intake of air from in the apartment, but that air is mixed from the entire house. If the shower is on in one room it can't detect that, and it can't react based on air quality and CO2 at all.
I've already got a fleet of CTRL ONEs across the house. They're smart thermostats, and they gather accurate data on the temperature, humidity and CO2 of each room. Using this data, I can control the ventilation through Home Assistant automations to make it react much faster. Additionally, I can use it to entirely replace the remote, as I can add a widget to the touchscreen ePaper display and control it manually.

What is the CTRL ONE? Check it here.
So I'm only really interested in the 1, 2 and 3 buttons, as once I'm done, I can create my own automations to control the system. I still do need to connect to the auto button though, as it's part of a button press combination to put the remote into pairing mode. Just in case.
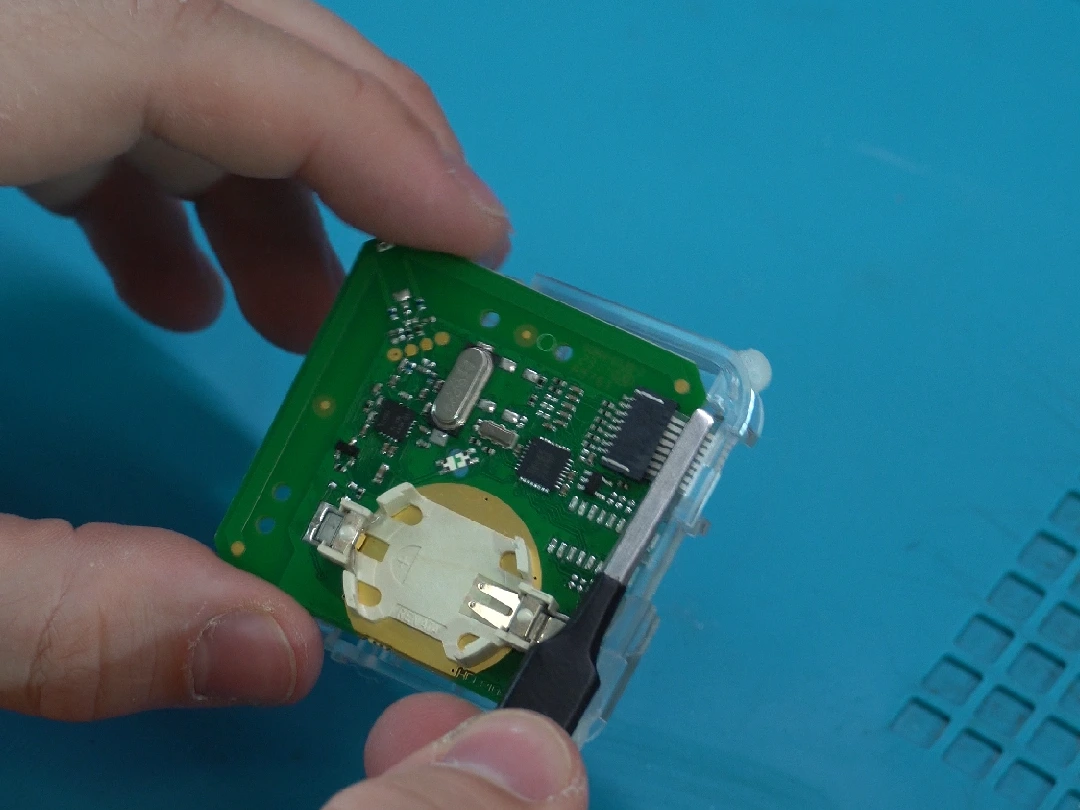
Flipping the board over, this little ribbon cable connects the button pads to the PCB. The main problem with this approach compared to reverse engineering the communication protocol is that we can only send commands via the remote; we have no way of asking the unit what fan speed it's currently on.
This is quite easily solved though. As this is the only remote, we can have the attached ESP32 remember what button it last pressed. As there is no other way to set the speed, we can be sure that it's always in sync. So I detached the ribbon cable to the buttons completely, so they can't be accidentally pressed. Only the ESP32 will be able to.
First up, I need to add some wires to tap into the lines running to the buttons. A microscope is entirely optional but allowed me to get this nice shot:
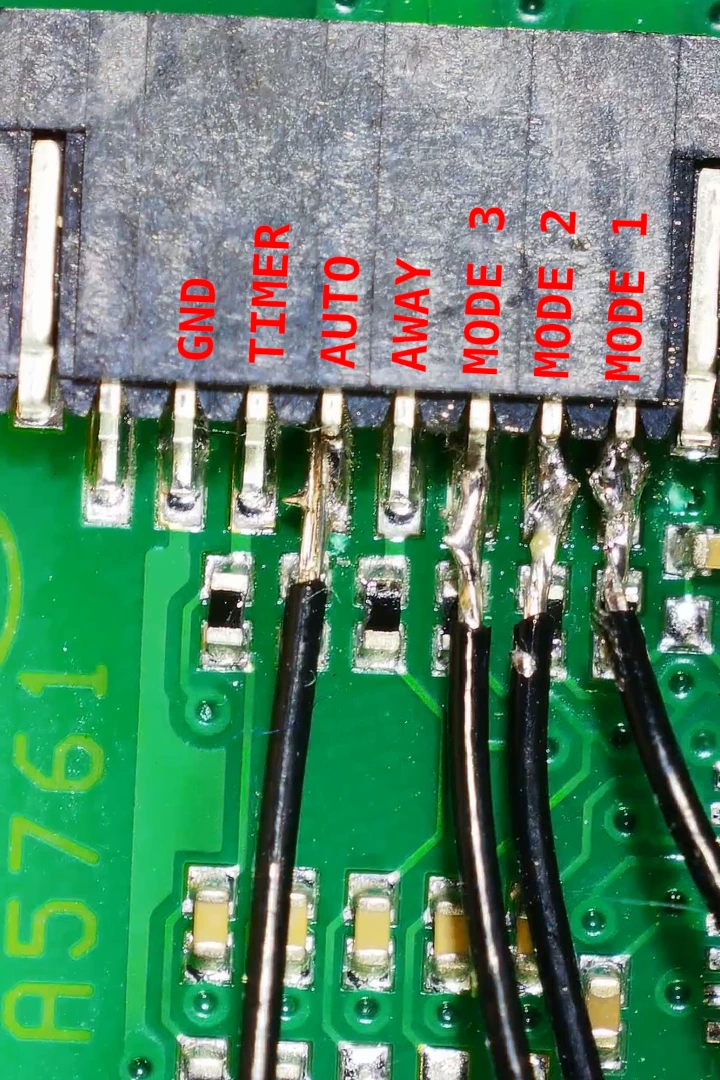
This really puts my shaky solder work under scrutiny... anyway, the 3 right wires hook up to 1, 2 and 3, while the left-most wire connects to the auto button. The other pads include some timer buttons and a ground pin.
I want to give credit where it's due - I'm not the first to wire up this remote, even though I went about it a different way. https://vdbrink.github.io/esphome/orcon_mechanic_ventilation.html. Ronald made my life way easier, as he already figured out what each of the pins on the remote do. I've also included labels in the picture above so you know which is which.
He has a no-soldering approach which is nice, but it requires the purchase of a few parts. It also keeps using the battery in the remote, which is a shame when we're running a USB cable already. For me, this entire project was "free" as I had an ESP32 and some wires lying around already.
The last part to handle is power. The remote was powered by a little coin-cell battery, which would be entirely inadequate to power an ESP32. My intention is to tuck this next to a power socket and never touch it again, so instead I'll be relying on the USB port of the ESP32 dev board to power everything. These coin cell batteries are already around 3.3V, so all I need to do is tap into the 3.3V pin on that dev board and supply it to the remote.
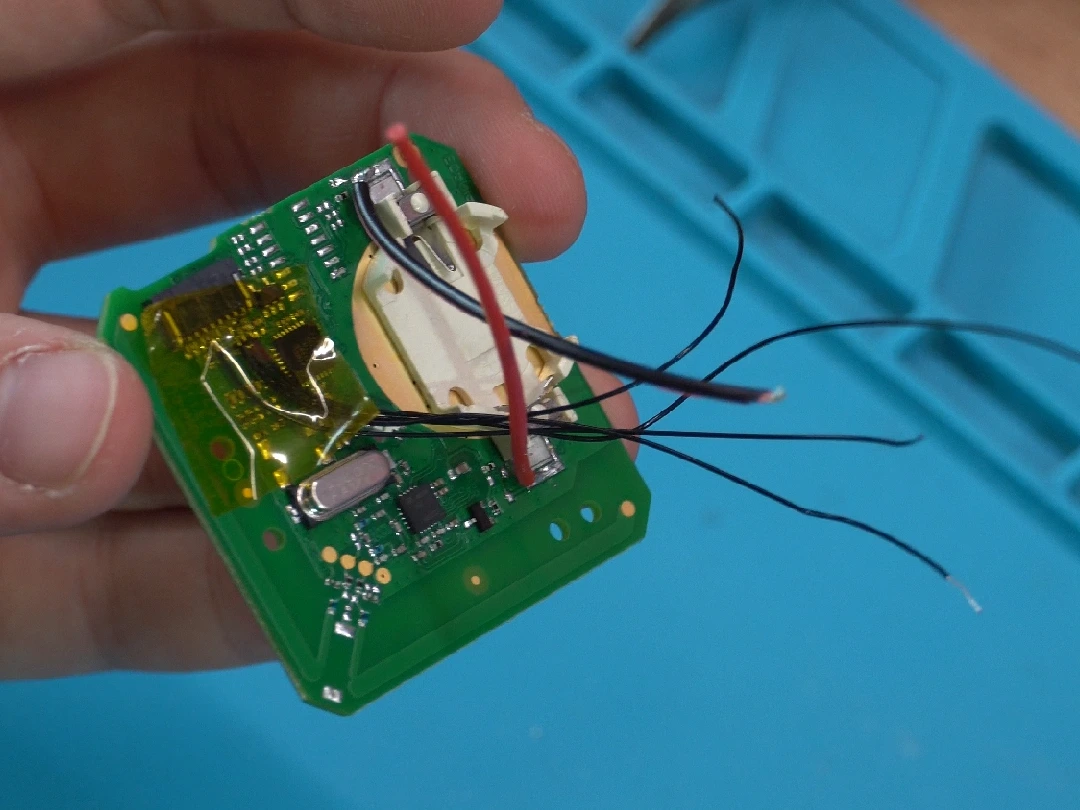
That's also why I didn't bother adding a wire to the ground pin of the button connector earlier. They will both share ground through the wires I added on to each side of the battery holder. The kapton tape is just there for support, as these small wires could be quite easily ripped off.
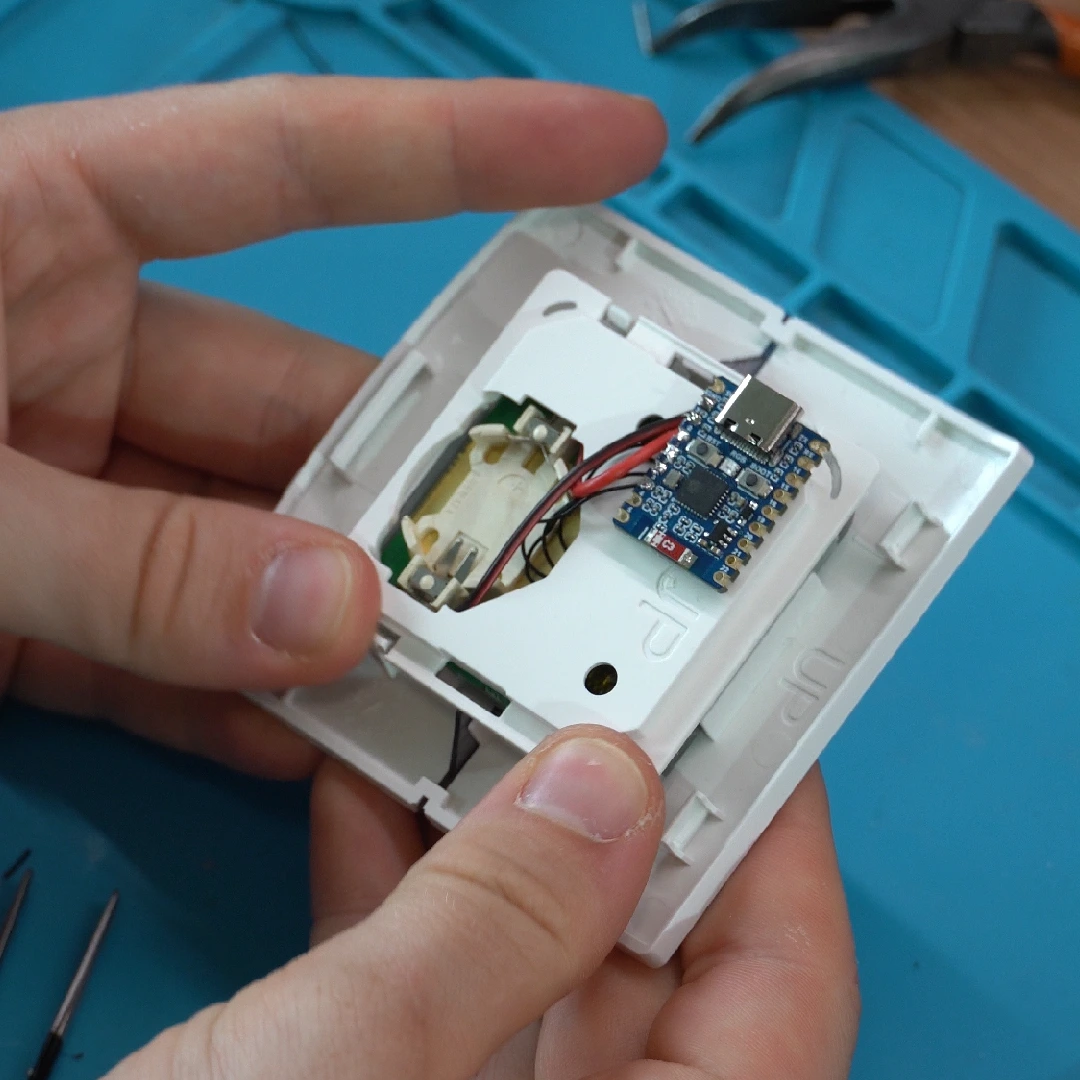
Here's everything soldered up. I'm using a little Waveshare ESP32-C6 Zero dev board, just because that's what I had lying around. It's got an onboard USB C port that will be used to program and power the whole thing. The two power wires are connected to the 3.3V pin and ground, with the 4 button wires going to GPIOs along the side.
I thought about making a custom case for this, but the remote housing was already the perfect size! All I had to do was stick the ESP32 down with some foam adhesive tape.
Configuring ESPHome
The last thing to do is program the ESP32 to do my bidding. First, I need it to know about each button and how to press it. Then, I want to create a number template sensor that, when changed, presses the corresponding button. If it's changed to 2, press button 2. It will then remember what number it's currently on, and if the number changes, it will press the corresponding button.
esphome:
  name: ventilation-control
  friendly_name: Ventilation Control

esp32:
  variant: esp32c6
  flash_size: 4MB
  cpu_frequency: 80MHz # Not necessary but it doesn't need to do much and this saves a tiny bit of power
  framework:
    type: esp-idf

api:

ota:
  - platform: esphome

wifi:

network:
  enable_ipv6: true

sensor:
  - platform: uptime
    name: Uptime
    id: uptime_sensor
  - platform: wifi_signal
    name: Signal Strength
    id: wifi_sensor

output:
  - platform: gpio
    id: fan_1_output
    pin:
      number: GPIO0
      inverted: true
      mode:
        output: true
        open_drain: true
  - platform: gpio
    id: fan_2_output
    pin:
      number: GPIO1
      inverted: true
      mode:
        output: true
        open_drain: true
  - platform: gpio
    id: fan_3_output
    pin:
      number: GPIO2
      inverted: true
      mode:
        output: true
        open_drain: true
  - platform: gpio
    id: fan_auto_output
    pin:
      number: GPIO3
      inverted: true
      mode:
        output: true
        open_drain: true

button:
  - platform: restart
    name: Restart
  - platform: safe_mode
    name: Restart (Safe Mode)

  - platform: output
    id: fan_1_button
    output: fan_1_output
    duration: 200ms

  - platform: output
    id: fan_2_button
    output: fan_2_output
    duration: 200ms

  - platform: output
    id: fan_3_button
    output: fan_3_output
    duration: 200ms

  - platform: output
    id: fan_auto_button
    name: Fan Auto
    output: fan_auto_output
    duration: 200ms
    disabled_by_default: true
    entity_category: diagnostic

  - platform: template
    id: pairing_mode_button
    name: Pairing Mode
    disabled_by_default: true
    entity_category: diagnostic
    icon: mdi:link-variant
    on_press:
      then:
        - output.turn_on: fan_1_output
        - output.turn_on: fan_auto_output
        - delay: 3.1s
        - output.turn_off: fan_1_output
        - output.turn_off: fan_auto_output

  - platform: template
    id: pairing_additional_button
    name: Pair Additional Device
    disabled_by_default: true
    entity_category: diagnostic
    icon: mdi:link-variant
    on_press:
      then:
        - output.turn_on: fan_2_output
        - output.turn_on: fan_auto_output
        - delay: 3.1s
        - output.turn_off: fan_2_output
        - output.turn_off: fan_auto_output

number:
  - platform: template
    id: fan_speed
    name: Fan Speed
    icon: mdi:fan
    optimistic: true
    restore_value: true
    min_value: 1
    max_value: 3
    step: 1
    on_value:
      then:
        - if:
            condition:
              lambda: "return int(x) == 1;"
            then:
              - button.press: fan_1_button
        - if:
            condition:
              lambda: "return int(x) == 2;"
            then:
              - button.press: fan_2_button
        - if:
            condition:
              lambda: "return int(x) == 3;"
            then:
              - button.press: fan_3_button
Here's the ESPHome configuration. The top half defines the buttons, and when instructed, holds it down for 200ms. They're set to open-drain which basically means that when pressed it will pull the pin up to 3.3V, and when not pressed, it will act as though it's disconnected. This is important as it replicates best how the buttons worked previously, as the circuitry already pulls itself to ground when the button is not pressed.
The bottom half is where the magic happens. The number template sensor stores the current fan setting, and presses the right button when it changes. This is what gets exposed to Home Assistant - the buttons themselves should not be exposed, because if they get pressed outside of the template sensor, then the template sensor loses track of the current state of the fan.
The Home Assistant automation
With this in place, it's time to build an automation! I have a specific set of rules I want it to follow:
- If the temperature inside is above 23 and the temperature outside is lower, set the fan to 3 to cool down the apartment faster
- If the CO2 in any room goes above 600ppm set to 2, above 1000ppm set to 3
- If the humidity in any room starts increasing faster than 2% per minute, set to 3
The last one is important as the relative humidity can vary greatly between seasons. If you just set a static number, chances are on a hot and rainy day, the fan will run at full speed the entire time as it's above the threshold. By tracking the rate of change, we can detect when a shower is first started, as that will show as a sudden rise over the course of a few minutes.
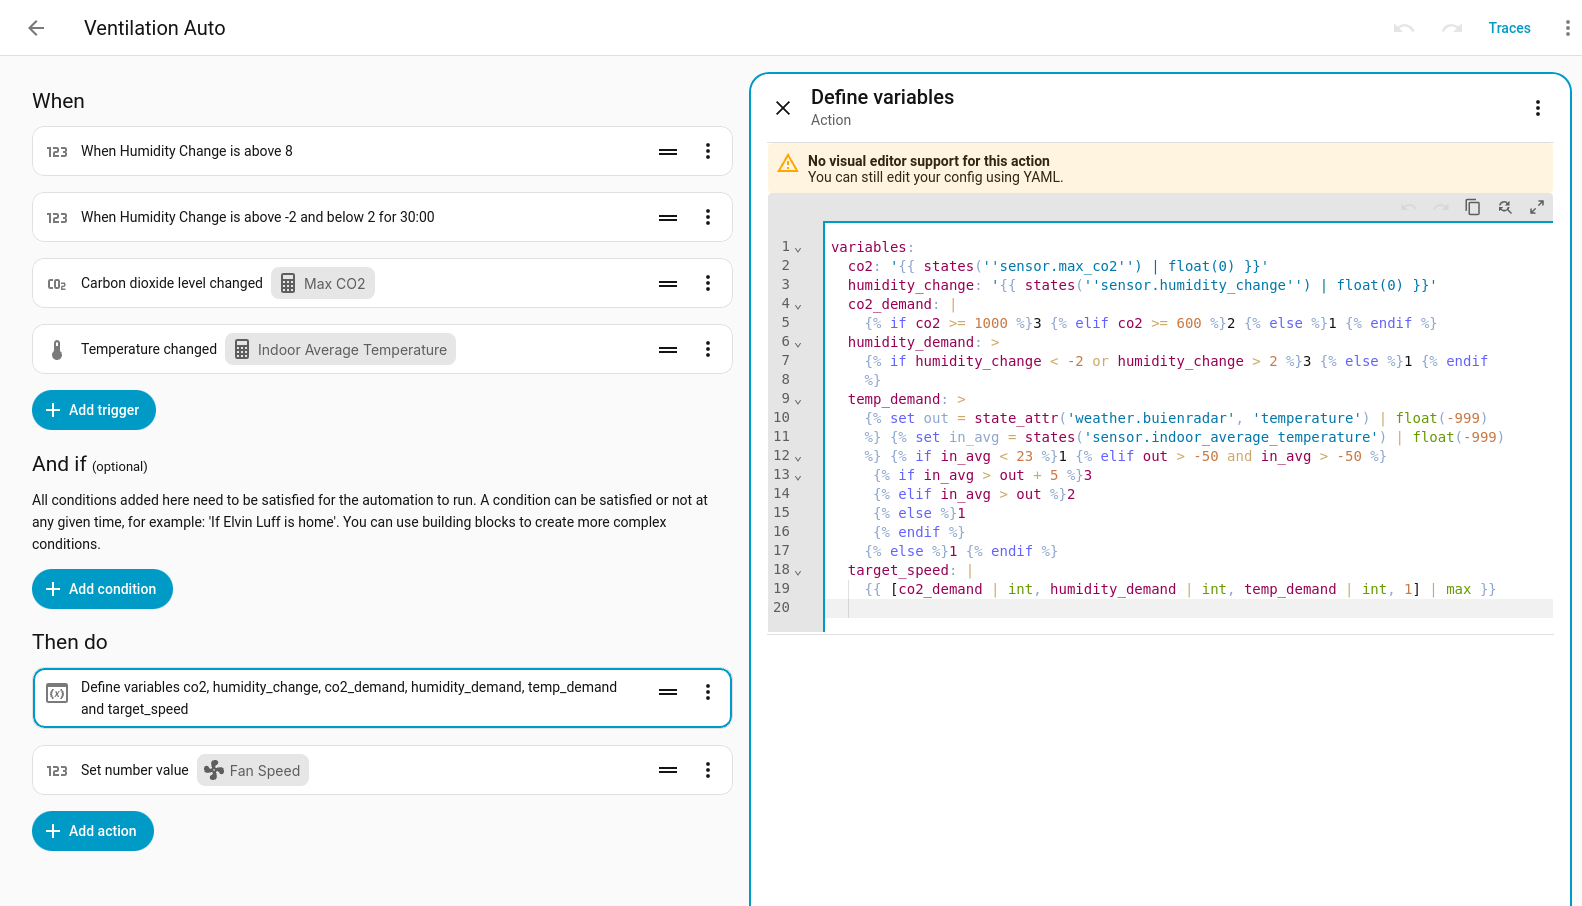
Here's what the automation looks like. Before creating the automation, I first created a set of helper devices that aggregate the maximum CO2, humidity and temperature values from every CTRL ONE across the house. If any of them reach the threshold the automation is triggered. This variables block then evaluates each of the rules I set, and sets the number value on the ESP32 accordingly.
variables:
  co2: '{{ states(''sensor.max_co2'') | float(0) }}'
  humidity_change: '{{ states(''sensor.humidity_change'') | float(0) }}'
  co2_demand: |
    {% if co2 >= 1000 %}3 {% elif co2 >= 600 %}2 {% else %}1 {% endif %}
  humidity_demand: >
    {% if humidity_change < -2 or humidity_change > 2 %}3 {% else %}1 {% endif
    %}
  temp_demand: >
    {% set out = state_attr('weather.buienradar', 'temperature') | float(-999)
    %} {% set in_avg = states('sensor.indoor_average_temperature') | float(-999)
    %} {% if in_avg < 23 %}1 {% elif out > -50 and in_avg > -50 %}
     {% if in_avg > out + 5 %}3
     {% elif in_avg > out %}2
     {% else %}1
     {% endif %}
    {% else %}1 {% endif %}
  target_speed: |
    {{ [co2_demand | int, humidity_demand | int, temp_demand | int, 1] | max }}
The super cool thing is that I can grab more than just what the CTRL ONE gives me. By giving a weather source to home assistant, it also has the outside temperature, so it knows when it's colder outside than inside.
While the automation covers 95% of what I want, sometimes I need to clear out the smell from my laser cutter, or I'm cooking and need a little more. The widget on the CTRL ONE allows me to override what the fan is currently set to. When pressed, it disables the automation for a few hours.
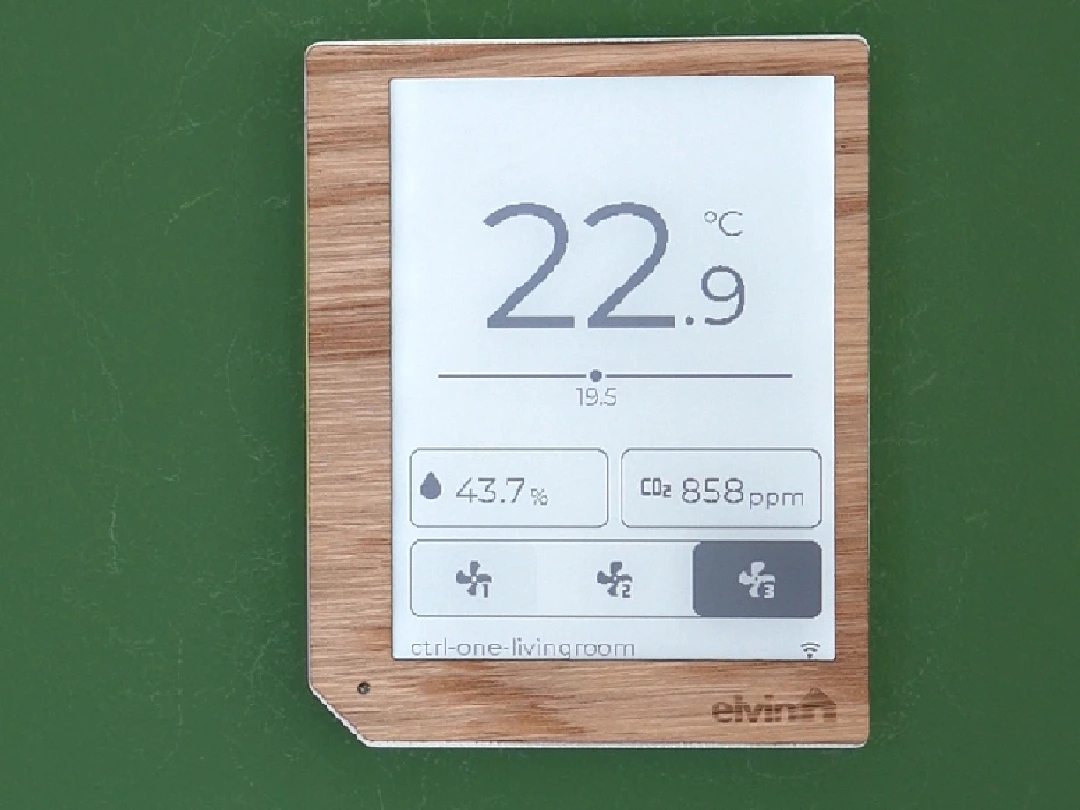
That's where the CTRL ONE really comes into its own. Not only am I now able to automate my entire ventilation system via Home Assistant using the data collected from its sensors, but I can also use it as a replacement of the remote itself, giving my control from any of the device in the house.
The CTRL ONE is on sale now! If you're looking for a few of them to kit out your home, orders over €300 get free shipping.